Revamp Your Home with Silicone Paint: A Step-by-Step Tutorial
Intro
Silicone paint is a type of paint that is ending up being progressively popular for home restoration jobs. It is a versatile and long lasting choice that offers many benefits over standard paint. In this short article, we will check out the value of utilizing silicone paint for home renovation and discuss its many benefits.
Advantages of Using Silicone Paint for Home Renovation
One of the main advantages of using silicone paint for home renovation is its sturdiness and longevity. Silicone paint is known for its capability to endure extreme weather, making it an ideal option for outside walls. It is also resistant to splitting, peeling, and fading, guaranteeing that your paint task will last for years to come.
Another benefit of silicone paint is its resistance to moisture and mold. This makes it a terrific option for locations of the home that are susceptible to moisture, such as restrooms and basements. Silicone paint produces a protective barrier on the walls, avoiding wetness from seeping in and causing damage. It also hinders the development of mold and mildew, keeping your walls clean and healthy.
In addition to its sturdiness and resistance to moisture, silicone paint is likewise simple to tidy and keep. Unlike standard paint, which can be challenging to clean without harming the surface, silicone paint can be quickly wiped clean with a moist fabric. This makes it a fantastic choice for high-traffic locations or homes with children or animals.
Silicone paint is environment-friendly and non-toxic. It does not consist of damaging chemicals or unstable natural substances (VOCs), making it a safe option for both the environment and your health. By choosing silicone paint for your home remodelling task, you can reduce your carbon footprint and create a healthier living environment.
Preparing Your Home for Silicone Painting: Essential Steps
Before using silicone paint to your walls, it is important to effectively prepare the surface area. This will make sure that the paint adheres well and supplies a smooth and even end up. Here are some vital actions to follow when preparing your home for silicone painting:
Cleaning and repairing walls: Start by thoroughly cleaning up the walls to eliminate any dirt, dust, or grease. Utilize a mild cleaning agent and warm water, and scrub the walls with a sponge or soft brush.
Eliminating old paint or wallpaper: If there is existing paint or wallpaper on the walls, it is crucial to eliminate it before applying silicone paint. Use a scraper or putty knife to gently peel away the old paint or wallpaper.
Sanding and priming walls: After eliminating any old paint or wallpaper, sand the walls to develop a smooth surface area for the silicone paint. Once the walls are sanded, use a coat of guide to help the silicone paint adhere better and supply a more even complete.
Choosing the Right Type of Silicone Paint for Your Home
When picking silicone paint for your home renovation project, it is important to consider the various types readily available and select the one that finest suits your requirements. Here are some elements to consider when picking the best type of silicone paint:
Exterior vs. interior: Determine whether you need silicone paint for outside or interior walls. Exterior silicone paint is specifically developed to stand up to extreme weather conditions and supply long-lasting protection versus moisture and UV rays.
2. Complete: Consider the wanted finish of your walls. Silicone paint is readily available in a range of finishes, consisting of matte, satin, and gloss. Choose a finish that matches the design of your home and matches your personal choice.
3. Color alternatives: Look for a brand name of silicone paint that uses a wide variety of color alternatives. This will permit you to discover the best shade for your walls and accomplish the preferred search for your home.
4. Quality: It is essential to select a high-quality silicone paint that will supply lasting outcomes. Try to find a brand name that is understood for its durability, resistance to wetness and mold, and ease of application.
Tools and Materials Needed for Silicone Painting
Before you begin silicone painting your walls, ensure you have all the required tools and products. Here is a list of what you will need:
- Silicone paint: Purchase enough silicone paint to cover the wanted location. Ensure to pick the right type of silicone paint for your job, whether it is for outside or interior walls.
- Paint roller and tray: Use a high-quality paint roller with a medium nap to use the silicone paint. A paint tray will be needed to pour the paint into.
- Paintbrushes: Have a few various sizes of paintbrushes on hand for touch-ups and hard-to-reach areas.
- Drop fabrics or plastic sheeting: Protect your floorings and furniture by covering them with ground cloth or plastic sheeting.
- Painter's tape: Use painter's tape to mask off areas that you do not want to be painted, such as trim or windows.
- Sandpaper: Have sandpaper on hand for any touch-ups or raveling imperfections on the walls.
- Primer: If essential, apply a coat of guide before applying the silicone paint.
When choosing tools and materials, choose top quality products. This will ensure that you accomplish the best results which your paint job lasts for years to come.
Step-by-Step Guide to Silicone Painting Your Walls
Now that you have actually prepared your walls and gathered all the needed tools and products, it is time to start silicone painting. Follow these detailed guidelines for a successful paint task:
1. Prepare the space: Remove any furnishings or decors from the space, or cover them with drop cloths or plastic sheeting. Use painter's tape to mask off locations that you do not wish to be painted, such as trim or windows.
2. Pour the paint: Pour the silicone paint into a paint tray. Dip the roller into the paint, making certain to uniformly coat it.
Start painting: Begin by painting the edges and corners of the walls with a paintbrush. Once the edges are painted, use the roller to apply the silicone paint to the rest of the wall.
4. Apply additional coats: Depending on the desired finish and coverage, you may require to apply several coats of silicone paint. Enable each coat to dry totally before using the next one.
5. Touch-ups: Once the walls are dry, check them for any missed out on spots or imperfections. Utilize a little paintbrush to touch up any locations that require it.
Tips for Achieving a Smooth and Even Finish with Silicone Paint
To accomplish a smooth and even end up with silicone paint, follow these pointers:
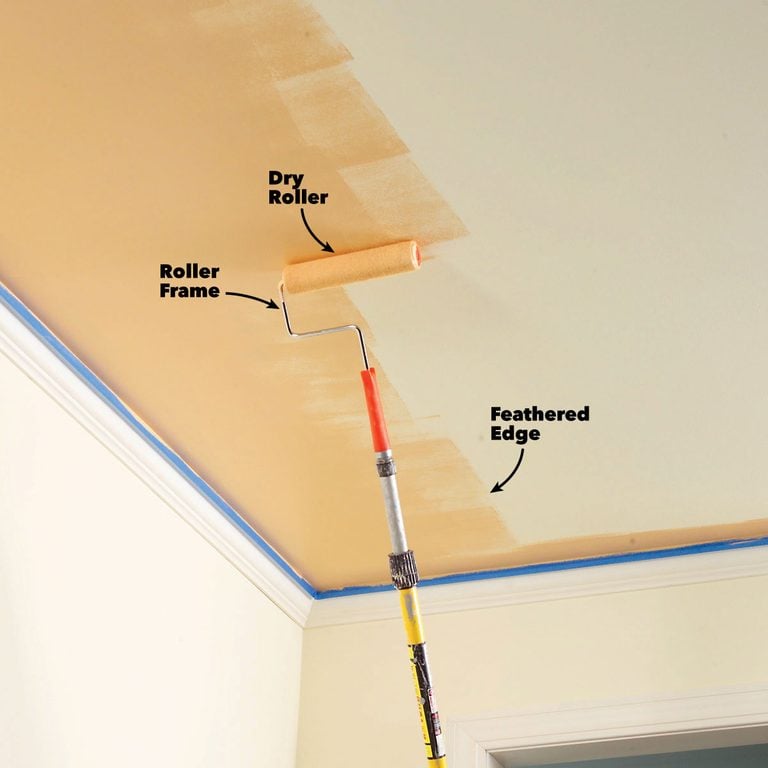
1. Prevent streaks and drips: To prevent streaks and drips, make sure to use the silicone paint in thin, even coats. Do not overload the roller with paint, as this can result in irregular application.
2. Utilize a roller or brush: Depending on the size of the area you are painting, utilize either a roller or brush for application. A roller is best for large, flat surface areas, while a brush is much better for edges and corners.
3. Operate in small sections: To guarantee that the paint does moist before you have a possibility to blend it, operate in small areas. This will permit you to preserve a damp edge and achieve a seamless surface.
4. Blend the paint: When using the silicone paint, ensure to blend each stroke with the previous one. This will help to remove any visible brush or roller marks and produce a smooth and even complete.
Common Mistakes to Avoid When Using Silicone Paint
While silicone paint is relatively simple to utilize, there are some typical errors that can take place. Here are a couple of mistakes to avoid and pointers for troubleshooting typical concerns:
1. Using too thick of a coat: Applying too thick of a coat can result in streaks, drips, and an uneven finish. Make certain to use the silicone paint in thin, even coats for the best results.
2. Not permitting enough drying time: It is necessary to allow each coat of silicone paint to dry totally before using the next one. Failure to do so can result in an ugly or sticky surface.
3. Not appropriately preparing the walls: Properly preparing the walls is vital for an effective paint job. Ensure to tidy, repair, and prime the walls before using the silicone paint.
4. Not utilizing high-quality tools and products: Using low-quality tools and products can result in a below average paint task. Purchase top quality items for the best results.
Caring for Your Silicone-Painted Walls: Maintenance Tips
To keep your silicone-painted walls looking their finest, follow these upkeep tips:
1. Regular cleansing: Silicone paint is simple to clean and preserve. Simply wipe down the walls with a wet fabric or sponge to remove any dirt or spots.
2. Prevent severe chemicals: Avoid utilizing severe chemicals or abrasive cleaners on your silicone-painted walls, as they can harm the surface. Stick to moderate cleaning agents and warm water for cleaning.
3. Prevent damage: To avoid damage to your silicone-painted walls, avoid hanging heavy items straight on the walls. Usage wall anchors or hooks to disperse the weight uniformly.
4. Touch-ups: If your silicone-painted walls become harmed or broken, touch them up with a little paintbrush and matching silicone paint.
By following these maintenance suggestions, you can keep your silicone-painted walls looking fresh and vibrant for years to come.
Conclusion: Transform Your Home with Silicone Paint
In conclusion, silicone paint is a flexible and https://dixipro.bg/toploizolacionni-sistemi/ long lasting alternative for home restoration tasks. By appropriately preparing your walls, picking the ideal type of silicone paint, and following the detailed guidelines, you can accomplish a smooth and even end up that will change your home.